I’ve always liked the design of the Pliatus-9 so I put together that plane over the 2018 winter season and flew it often at the field. Unfortunately, the plane decided to re-kit itself later in the year when the elevator control failed.
Needing a replacement, I discovered an option while Looking through the Tower Hobbies ad in the AMA magazine earlier this year, I noticed that they had a Pliatus-21 ARF at a discount so I purchased it. The box arrived and when I opened it I was happy to see how well it was packaged and was slightly overwhelmed by the number of parts.
This kit has everything but the engine and radio. Since early March was my birth month, I decided to put it together as a birthday present since it’s an ARF. How long could it take? The 50 page manual should have given me an inkling as to the length of time it would take to build the plane. (Naturally, I didn’t work on it every day) It still turned into a marathon as the plane was not finished until the middle of MAY! So much for ARF’s.
The instructions started out easy enough. Install the servos in the wings, add the control surfaces, and the retract system.
In great detail, the instructions took over 10 pages just to accomplish those steps. The instructions then moved to the fuselage.
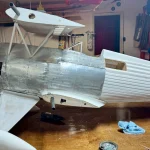
(Note the unique two part fuselage) Mating the two fuselage parts and then attaching the wings is necessary to align the horizontal stab to the wing. The instructions are quite explicit on how to accomplish the alignment. But the way the fuselage is notched, along with an alignment tube in the horizontal stabilizer left very little ‘wiggle’ room for adjustments. The rudder simply glues to the vertical stab. Since this is a two part fuselage, the control servos for the tail end involve running long extension wires to the servos that are located near the rear of the fuselage.
At this point, 27 pages into the manual, it was time to install the plumbing for the retract system, the throttle servo, and the nose gear steering servo. All these servos had preselected locations and just dropped in. Note what appears to be a large area to install the radio, gas tanks, and misc. parts.
How come I always run out of room to install anything.
Installing the engine is straight forward. Just double and triple check the clearance for the spinner.
All the hardware necessary to add the engine, or convert to electric, is included in the kit. I wanted to add a smoker to the plane and had to plan for the extra tank, plumbing, and pump (12). The end result looks a little like a rats nest.
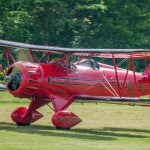
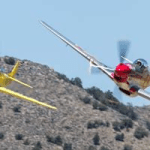
After all that work, the final result produced a plane that was fairly well balanced and needed no additional weight added anywhere. About the only problem was the nose gear! It was too short and the plane sat with a nose down attitude making it extremely difficult for it to rotate and get off the ground. Minor adjustments to the wheels and struts solved the problem and the plane was an excellent flyer just as the previous one had been.
A note from Ralph Grant:
My apologies to Ralph Doyle for taking so long getting this article published on the website. This has been an INSANE year at work. My Engineering Firm has been busy with the pandemic and I just haven’t had the time for the last 18mos I had in the past. Great article Ralph D. Sorry about the delay.