It started with a phone call:
“Hey man, I’m in Cumming Georgia for work and I’m pulling an empty 20′ trailer. I’m in the Extreme Flight warehouse right now. You want anything?” That butthead Dustin Whitrock knew I was using the “Shipping Costs” as an excuse to not pull the trigger on the massive aeronautical awesomeness I had been rambling on about for 2 years. “Holy Shit” I thought, “Do I get the 4 cylinder DA-200 version or the 2 cylinder DA-170 version?” A quick trip to the Desert Aircraft website showed me that to go real big, It would cost me a whopping $1250 bucks. But the money wasn’t the real deal breaker necessarily. I didn’t realize the DA-200 would require me to tune TWO carbs. “I barely can tune ONE” I thought to myself laughingly. Not to mention, I knew that baffling the 4 cylinders properly for cooling and the additional pipe system for it to quiet her down was also going to be another challenge I hadn’t done on a big bird yet. I don’t think anyone is running four cylinders of exhaust out the bottom of the cowl! So the Laser with the DA-170/DA-215 Firewall it is. I immediately asked him to put Chris Hinson on the phone. “Hey man, there is a sketchy looking skinny dude in there with a neck tattoo. If I purchase a plane from you will you let him deliver it for me?” “Also I don’t know how to purchase it from the website and not pay shipping” “Sure!, just tell me what you want and give me your credit card and we’ll make it happen.” So immediately I was a lot poorer and Dustin was loading 3 ginormous boxes into the trailer. Dustin had about a 12 hour drive before he made it back to the LOU and during that time I managed to Quadruple my plane investment with everything I needed to finish the plane.
First Stop, the Desert Aircraft website for a DA-170. Yeah, it would handle a DA-215 but that bad boy was almost another 50% and it wasn’t in stock. Little did I know that it would be in stock at least a dozen times before I even started the build! Next, MKS for 6 HBL-380’s for the ailerons and 4 massive HBL-3850 servo’s for the elevators and each side of the rudder finishing up with a HV-1220 for the throttle including carbon fiber servo arms throughout. Next, A trip through the Advanced Radio website for the Smoothflite 16 power distribution setup. Finally a quick stop back at Extreme Flight for the rest of the stuff I would need.
Covid-19 Delays and Facebook pressure:
Sadly, the pandemic was in full swing and I was working and travelling a ton. The plane literally sat in the basement hobby shop for almost a year. Finally, it took a “memory” on Facebook from ONE YEAR ago to push me into getting that bad boy built.
The 14 hour and 3000+ step(s) build:
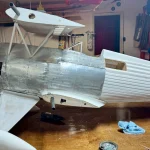
On Saturday night, April 23rd I spent about 2 hours trimming all the covering that was hiding the laser-cut control horn slots, sanded and painted the fiberglass control horns black, and installed them with Hysol Aviation Epoxy in preparation for a full contact Sunday build tomorrow. While the Hysol was doing its 12 hour dry, I assembled all the servo’s and electronics for a quick radio and AR Smooth Flite Sixteen checkout.
On Sunday morning I made the first of at least a dozen Latte’s and entered the basement at about 7:30. I wouldn’t exit without an airplane ready for the engine run-up. I’ve built about a dozen or more of these Extreme Flight planes. Its a good thing too because instructions do not exist for this airplane. I guess Extreme Flight figures if your building their biggest bird, you probably have no business doing so if you need instructions! The fit/finish and quality of the plane is second to none with every part fitting to typical Extreme Flight perfection!
Oh by the way, the 3000 steps I was referring to wasn’t the number of process steps for building. It is literally the number of steps I walked while building this plane according to my phone! These big birds are almost like building a damn full size. Once its together, to do anything to the “other side” you have to walk all the way around it. And if the wings are on it, you literally have to walk about 25 feet to get around! So you can get your exercise building as a side benefit.
Why the Advanced Radio SmoothFlite Sixteen?:
When you build birds this big, with this many servo’s of this size, you can’t just run them through your receiver. While the Futaba Receivers are all HV or high voltage handling 4S LiPO power sources with ease, the bus inside it cannot handle the immense current. These big MKS servos will pull as much as 8.2A when stalled. I’m powering the entire system with (2) 5400mAh hard case ROAR batteries in 2S LiPO configuration or 8.4VDC. So at full speed in the execution of a violent snap-roll with the sticks on the radio thrown into the corners, the 10 control surface servo’s will pull up to a total of 82 Amps at 8.4volts delivering an incredible total 6,000 oz-in of torque! The Smooth Flite will handle that current where the Copper Trace/Bus on the motherboard in the Futaba Receiver would most likely just melt. Also, were I to run all channels needed to the receiver, I would need double the number of channels. Futaba doesn’t even offer a receiver greater than 14 any longer (Although I do have a couple discontinued R7018SB’s on the wall). On the Smooth Flite setup screen, you can remap a single aileron channel to ALL SIX ailerons, set up to 14 points including center and end points, and reverse each one. Totally badass for servo matching where 3 servos have to be in perfect alignment on an aileron. So with the Smooth Flight I am able to purchase R7003SB Three channel receivers that have SBus and SBus2 onboard instead of the more expensive R7014SB 14 channel versions. Not to mention that if I wanted GYRO capability I would need to add a Bavarian Demon Cortex Gyro as well:
| Flight Controls Channel List: | # of Futaba Channels | # of Smooth Flite Channels |
| Left Aileron 1, 2, 3: MKS HBL-380 (569oz-in, 0.082sec, 8.1A) | 3 | 1 |
| Right Aileron 1, 2, 3: MKS HBL-380 (569oz-in, 0.082sec, 8.1A) | 3 | 0 |
| Left Side Rudder, Right Side Rudder: MKS HBL-3850 (792oz-in, 0.104sec, 8.2A) | 2 | 1 |
| Left Elevator Half, Right Elevator Half: MKS HBL-3850 (792oz-in, 0.104sec, 8.2A) | 2 | 1 |
| Throttle Servo: MKS HV-1220 (319oz-in, 0.10sec, 4.5A) | 1 | 1 |
| Flight Stabilization On/Off | 1 | 1 |
| Flight Stabilization Gain | 1 | 1 |
| Ignition On/Off | 1 | 1 |
| Future Smoke Pump if Added | 1 | 1 |
| Flight Stabilization / Gyro Capable? | NO | YES |
| In receiver servo matching | NO | YES |
| 15 Channels Needed | 8 Channels Needed |
Telemetry is also an added bonus of Futaba flight systems. I had some engine heat concerns after the maiden so I added Temperature and RPM to help me dial in the carb needle settings. I run Telemetry on almost all of my airplanes.
Telemetry:
| Telemetry: The Futaba S-Bus2 Advantage: |
| Receiver Battery Voltage and Current Used from Smooth Flite- Battery #1 (Alarm at 30%) |
| Receiver Battery Voltage and Current Used from Smooth Flite- Battery #2 (Alarm at 30%) |
| Engine Temperature (Degree’s F) from SBS-01T Sensor (Alarm at 350F) Added after maiden. |
| Engine RPM (Optical Sensor) from SBS-01RO Sensor (Alarm at 0 and 7000 RPM) Added after maiden. |
Cost Advantage – Smooth Flite:
Advanced Radio(AR) Smooth Flite Sixteen is actually the least expensive option with the best value of features as you can see below.
| Cost Breakdown with/without SmoothFlite 16 | With Smooth Flite 16 | Traditional Receiver |
| (2) R7014SB Receivers ($229ea) | $460 | |
| (2) R7003SB Receivers ($119ea) | $240 | |
| Smooth Flite 16 | $299 | |
| Bavarian Demon Cortex Pro Gyro | $299 | |
| Power Distribution Board (Smart-Fly, Redwing, PowerBox) | $260-$490 | |
| Total investment with Flight Stabilization / Gyro: | $530 | $1019 |
The Engine Run-Up:
Here is a video of the first start of the airplane. Actually the second. It yanked the tail restraint out of the ground on the first start and scared the hell out of me. I managed to grab the right wing and pirouette with her until I managed to drag the prop through the grass and kill her right before I went inside to change my shorts. On the second run up, I tied it to the deck column. She wasn’t going anywhere. I did measure the static thrust of the engine with a fish scale installed in the rope holding it and it generated a whopping 118lbs-force of thrust. Crazy!!!
The Maiden Pre-Flight (Yes its a good idea):
When you have something you have invested this much into, you don’t just half ass build, gas it, and send it. I got up on Sunday Morning of June 5th and decided to put the cowl on her for the Maiden. First, I wanted to go through the assembly process one more time to make sure I had it down before I got to the field. I learned a long time ago on these more complicated maidens to practice putting it together, make sure everything is in place, and determine that you have everything BEFORE you get to the field. Of course, during the assembly I accidentally pushed a blind nut through the fuse that was one of two that hold the right elevator half on and had to repair it. An hour later I had a new one installed and the epoxy was dry. It was about 2:00 and I knew that the number of people there would be at a low for the day. I don’t really like maidening things with an audience. Especially a 45lb giant scale bird. Time to head to the field.
My buddy Dustin was already there and I assembled her without a hitch , answered a few questions, and got down to business. I literally thought I was going to throw up I was so nervous. Going through the following Checklist helped to calm my nerves.
The Pre-Flight Checklist:
- All fasteners on all linkages complete with locknut and tight. Check.
- 4 Bolts in Wing. Check.
- 4 Bolts in Stab Halves. Check.
- Both Batteries Charged and Plugged In. Capacity check via onboard telemetry and by hand. Check.
- Push all servo connections into receiver. Check.
- Power on the Radio. Correct Model Selected? Check.
- All switches in their default positions? Check.
- Power on the Plane by pulling the pin / flag.
- Aileron Direction. Check
- Elevator Direction. Check.
- Rudder Direction. Check.
- Throttle Direction. Check.
- Stability/Gyro On/Off. Check.
- Stability Direction/Correction. Check.
- Stability/Gyro GAIN Setting. Check.
- Remove the Propeller Protective Covers. Check
- Remove the vent on the fuel tank. Check.
- Remove the 3D printed Exhaust Plugs. Check.
- Make sure the fuel brought from home is 40:1 Redline Aviation Fuel. Check.
- Top off the fuel tank with fuel and check for leaks. Check.
- Cycle the Choke and make sure Dustin knows that up is open and down is closed. Check.
- Put the radio in “Radio Check” mode which lowers its output. Walk a 50 yard circle around the plane cycling L/R Aileron, U/D Elevator, L/R Rudder while people watch the controls. Review the LED’s on the redundant receivers for signal loss. Check.
The Pre-Startup Checklist and Starting Procedure:
- Go over plan with Dustin since he is cranking the thing and execute the following procedure:
- Restrain the plane at the large scale system at the east end of the field. Check.
- Pull the choke on (Down). Check.
- Turn the Ignition On from the radio. Observe Red LED. Check.
- Push Full Throttle on Radio. Verify on Servo. Check.
- Confirm verbally choke is on. Check.
- Wearing a starting glove, flip the engine counterclockwise until the engine fires. About 5-8 Flips. Check.
- Turn Choke off and Reduce Throttle to 2 clicks of throttle. Confirm with Dustin both. Check.
- Flip the engine 3-5 times and it should start. Check.
- Let engine warm up at idle and do a second radio check. Checking for glitches or radio interference. Check.
- Run up the engine several times to make sure that the needles are set properly. Check the transition from idle to full power several times. If it dies the low needle is lean. If it stutters its rich.
By this time the engine was really warm. So warm that I was worried that it might be hard on it or it might impact its reliability. We had been running the motor for about 10-15 minutes at idle and various ranges on the ground. So we turned her off and setup a fan to blow air across it for about 30 minutes. While it was cooling down, I was tinkering with the choke and… Accidentally disconnected it from the choke arm. Which forced a 30minute cowl removal, choke repair, and cowl installation.
Flying the Laser:
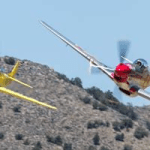
Once the motor was cool to the touch we fired it up and quickly made our way to the flightline. After a quick run-up to make sure it was reliable, I turned her into the wind, throttled it up, and took off east down the runway. This plane has power to burn.
I flew her for the first few turns laps around the field before turning the Smooth Flite Stabilizer on. She needed about 2 clicks of up elevator. On subsequent flights I did an inverted 45degree upline and determined that she probably only needed the trim because she is just a hair nose heavy. I’ll leave it like that until I get some more experience flying her. I flew her for about 7 minutes and loved the sound she made when I flew low over the trees and pond on the left end of the runway. The echo of the exhaust was haunting coming out of there. I decided to put her on the ground to insure a running engine for the maiden landing. The motor temperature issue from earlier was looming in the back of my mind and I didn’t want any surprises. I lined her up heading downwind, made my turn to final and slowed the engine. She was loaded up a little and at first I was a little nervous that she would come in hot. After about 5 seconds she shifted gears into a lower idle and actually died about 4′ off the runway. She settled in without a bounce and the landing was a success. What an amazing flying bird. As they say, Bigger is Better.
Subsequent Flights:
After the maiden I decided I needed more airflow. I opened up the “Can” exhaust hole in the firewall which I had covered previously and installed the vent grill in the bottom of the plane, intended to cool said “Cans”. I also installed the temperature telemetry and optical RPM sensors in the cowling and made sure it was all working on the Sbus2 network. I also improved the access to the carb needles from the bottom of the cowl by cutting a slot for the allen wrenches to “Turn” from below. While I had her apart, I changed the propeller out from a Xoar laminated to a Falcon Carbon to try and gain some efficiency. During the maiden it was obvious that the Xoar was going super-sonic and beating the shit out of the air. It sounded awesome but who knows what the cavitation was doing to the motor etc. I blew off Friday and spent about 5 hours at the field logging about 8 flights and adjusting the low and high needles to suit. On the last flight Friday I was ripping east (Downwind) Inverted and the engine died. I rolled her over, turned her into the wind, and she settled in without a hitch, near the big bird starting station. Sweet. This airplane gives you a ton of confidence to fly. After inspection it looked like the clunk was shoved pretty hard into the corner of the tank. The fuel line must have “Stretched/Expanded” in the 40:1 gas/oil mixture. I tore her down and went home to fix in the A/C.
Conclusion:
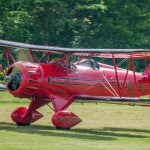
I can’t say enough about this bird. Build quality, design, flight characteristics, etc. What can I say. Its an Extreme Flight Plane! If you have the space, a big enough mode of transportation, and the passion to spend this much on an airplane, I cannot recommend the 125″ Laser. What an amazing bird. Its easily my favorite plane right now. I think if I had a trailer for it smoke would be mandatory. Problem is, to get it into the Navigator it has to touch about every leather surface in there. I’m not sure I’m ready for my SUV to smell like smoke oil AND gasoline right now. I bet the DA-170 blows smoke like a freight train though. Hmmmmm.
See you at the field!